Installation Guide
Release 2019.1 is the first New World ERP release that will be installed with Tyler Deploy. Tyler Deploy is a Tyler-wide deployment software that will provide a common install framework across Tyler products and will simplify upgrades in the future. Each product will deploy with the same framework using variables within Tyler Deploy and software called tentacles that will be deployed to your servers. These tentacles will communicate with the deploy server at Tyler over a server port using a Windows service. Details forthcoming in this document.
Note: The sections below are listed sequentially from top to bottom. Please follow them in order. At the end of each section, a link will guide you to the next section in the sequence. Some steps within a section may not apply to you.
To review hardware recommendations for this release, please navigate to https://check.tylertech.com. Use your personal email address and a password of Tyler to log in. Clicking on New World ERP will get you to the hardware recommendations.
For browser and Operating System support information on client machines or servers, please see the Technical Currency Matrix on Help Central.
To determine what versions of other Tyler products this release has been certified with, please see the ERP Compatibility Matrix on Help Central.
If your servers are new and have not had ERP installed on them in the past, please follow the New Server Setup Guide before continuing. When you have completed the New Server Setup Guide, click the link at the end of the guide to return to this page and continue with the installation process.
Before beginning the 2019.1 upgrade process, it is important to complete the following steps:
- Request a new license key from the support group.
- Create a backup of your database before installing.
- If you are using Virtual Machines, a snapshot is recommended to be taken before upgrading.
- Ensure your Application Server has Microsoft Visual C++ Redistributable 2015 (x86) installed on it.
- Install SQL Server 2012 Native Client, .Net Framework 4.6.2 (or higher) and Powershell 5.1 on your Application Server.
- Ensure that your SQL and SSRS servers (if applicable) also have Powershell 5.1 installed.
-
An SSL certificate is required on your Application and eSuite servers for this release. New World ERP recommends the following configuration, which also was recommended in version 2018.1:
- SSL certificate bound in IIS to the Default Website on port 443 that is 2048-bit length or longer. Various vendors exist that distribute SSL certificates.
- Self-signed certificates are not supported. Domain-signed certificates can be used.
- Sha-2 certificate is required.
Tyler Deploy requires a tentacle on each Windows Server that will accept software during the upgrade process. That would include your Application and web (eSuite) servers. If a Tyler infrastructure server is in place for software like Tyler Identity/Hub/etc., that server would also need a tentacle. The tentacles run as a Windows Service that communicates back to the deploy server via port 10943 and address tylerdeployer.tylertech.com.
To test for firewall connectivity before August 31, 2019, please navigate to this address on the server: https://tylerdeployer.tylertech.com:10943. A certificate error is fine in this case and a message like the below would indicate success:

After August 31, 2019, Tyler Deploy is being moved to a node-based AWS site to provide better connectivity. As such, the following ports need to be open from all servers with a tentacle (typically application and eSuite servers):
IP: 23.22.239.32
18.214.7.128
DNS
https://tylerdeployer.tylerdeploy.com:443
https://tylerdeployer2.tylerdeploy.com:443
https://tylerdeployer3.tylerdeploy.com:443
https://tylerdeployer4.tylerdeploy.com:443
https://tylerdeployer.tylerdeploy.com:10943
https://tylerdeployer2.tylerdeploy.com:10944
https://tylerdeployer3.tylerdeploy.com:10945
https://tylerdeployer4.tylerdeploy.com:10946
https://tylerdeployer5.tylerdeploy.com:10947
https://tylerdeployer6.tylerdeploy.com:10948
https://tylerdeployer7.tylerdeploy.com:10949
https://tylerdeployer8.tylerdeploy.com:10950
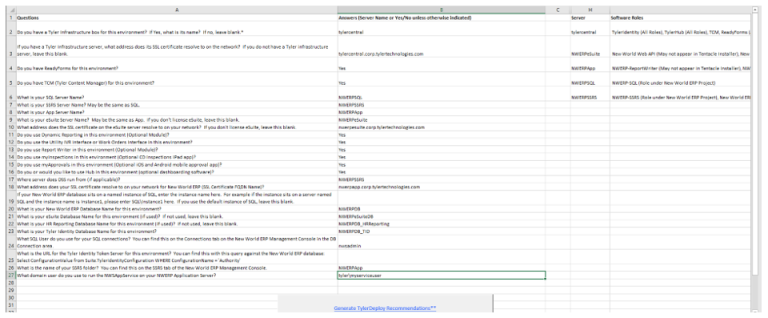
The ERP Decision Tree Excel spreadsheet has been made to assist in mapping out your environments for Tyler Deploy and the variables that would be populated in Tyler Deploy for the software that you license. There is a Directions tab on the spreadsheet that would be where you would start. Please note that the spreadsheet uses macros to generate the server recommendations for the Tyler Deploy tentacles. The Questionnaire tab will be blank when you enter the sheet. Fill out the answers in Column B, then click the Generate TylerDeploy Recommendations button to populate columns H and I. Columns H and I are used to assist with the first Tyler Deploy install document (Downloading and Installing a Tentacle):
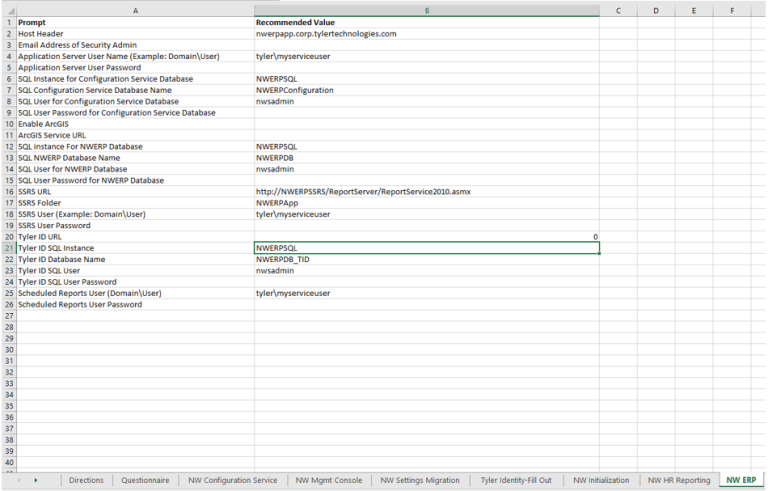
After the Questionnaire tab is populated, the tabs across the bottom of the spreadsheet will be populated with possible values to use in Tyler Deploy. Below is the NW ERP tab that displays the assistance this spreadsheet provides:
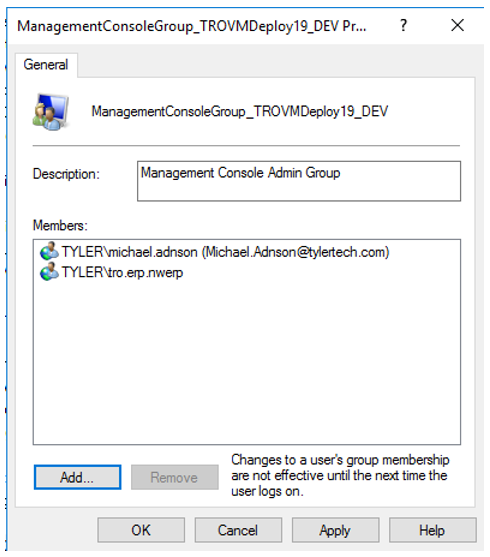
After deploying ERP, you will not be able to use the Management Console (URL: https://APPSERVERHOSTHEADERMAPPING/ManagementConsole#/Base) until users have been given security rights. On the Application Server, give the administrators rights in the security group ManagementConsoleGroup_INSTANCENAME in Server Manager > Computer Management. In the below example, these two users would be able to access the new Management Console website from anywhere within the network.
The process for applying a license key has changed slightly. The New World ERP App Server service is designed to start only when a license key is in place that matches the version of the application. If you do not apply a 2019.1 license key, you will not be able to use New World ERP. Please click here for help applying your new key.
On a new server deployment, you will want to check the location of the Document Output Path. This location is where report outputs will store and also where Echo file images render from. You can check the location of the Document Output Path and, if necessary, move it by following this link.
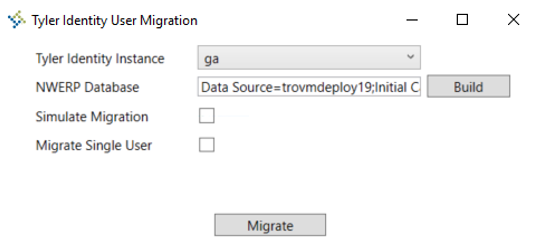
A user migration utility is required if you are running an upgrade from 2017.1 to 2019.1. You will find the migration tool at {Installation_Drive}\Octopus\Applications\{Tenant_Name}\{Environment_Name}\NWERP.TIDUserMigration\{Version_Name}.
The Tyler Identity User Migration Tool would be run on the server where Tyler Identity is deployed. Pick your Tyler Identity Instance, build a connection to your ERP database and you are ready to migrate. There are options to Simulate the Migration or Migrate Single User. A log report will generate after running the migration tool.